Jacen's Blog
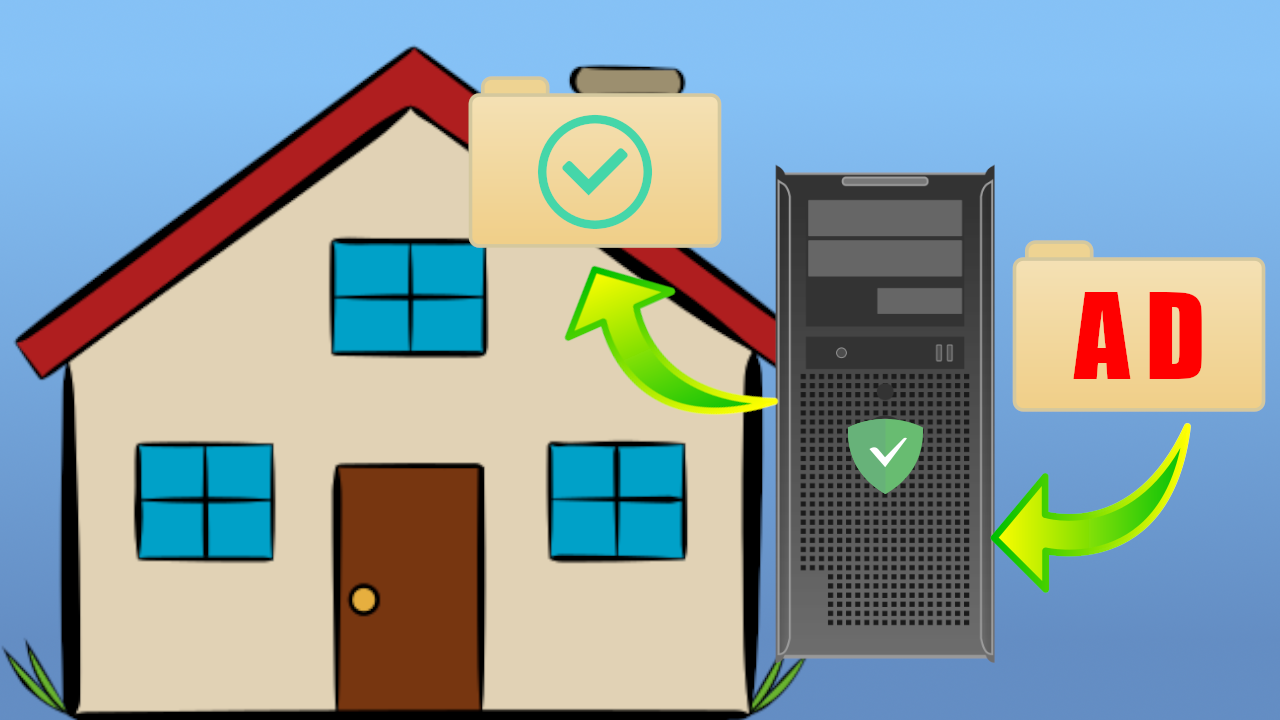
The Whole-Home AdGuard Proxy
July 14, 2025
I've talked about adblockers in the past, particularly my dislike of Pi-hole and preference toward AdGuard. However, AdGuard comes with a number of hangups, namely that you need a license for every device in your home that you want to protect. But what if you could protect your entire home from a single server? Is it doable?
To disclose, I do have an AdGuard affiliate link, but I also did purchase the product personally and would endorse it without the link. The real reason I'm using it for this project is because it's the only MitM-based adblocker available as far as I can tell, so it's the only one suitable for the setup I'm trying to accomplish here.
The Concept
AdGuard works similarly to normal extension-based adblockers like uBlock by viewing every network request that comes through your computer and filtering them based on a list of rules. Unlike DNS-based adblockers like Pi-hole, which can only filter based on domains, AdGuard can work effectively even in tricky scenarios, such as sites that serve ads and content from the same domain. Additionally, unlike adblockers like uBlock, AdGuard runs as a system service, allowing you to block ads in all apps, not just in your browser.
That's great and all, but that doesn't help with other devices on your network that don't have the AdGuard application installed. While we could purchase a license for every device, the cost of that adds up. Even if we did grab a license for each, signing into and configuring each one takes a lot of work, and AdGuard doesn't work with perfect effectiveness on every OS. What if there was a way to manage everything from a single device on the network?
AdGuard can be run in a proxy mode, allowing traffic from other devices to be filtered through the software. That means we can set up a dedicated adblocking server and make sure all network traffic is routed there before it goes out to the Internet. Easy, right?
Do note that, on top of the complicated setup, tunneling your network through a proxy creates an extra hop in the route, as well as potentially limiting your maximum bandwidth. Beyond that, while AdGuard is perfectly servicable for protecting a single device, I'm not sure that they optimized their software for proxying an entire network at speed.
In any case, with all the planning out of the way, let's start working on the implementation.
The OS
When I first conceptualized this setup, AdGuard was only available for Windows and Mac, meaning our adblocking server would have to be a Windows server. Since then, however, they've added a Linux version of the software. To be honest, the Linux version isn't anywhere close to where it needs to be for me to consider it usable for desktop, but it is more than sufficient for our proxy purposes. So, we have a decision to make: do we go with Windows or Linux?
While Linux has the advantage of being more lightweight and performant, I think using Windows has plenty of advantages. AdGuard is far more mature and full-featured on that platform, and the GUI will make it easier for us to quickly change our settings. Windows' DHCP server is also a bit more user-friendly, and we'll need a DHCP server as part of our setup. We'll also have access to IIS, which, while not the most elegant, will be more than sufficient to act as a web server (which we will also need; more on that in a moment).
With all that in mind, plus the fact that I'm intimately familiar with Windows server administration, I'll be setting up a Windows server as my proxy for this project.
Server Setup
Installing and configuring Windows Server is beyond the scope of this post, and there are plenty of guides for that anyway. Here are the things you will want to set up on that server.
- A static IP address to make sure your proxy IP doesn't change.
- The DHCP server role and a scope for the network you want to protect. Make sure you don't have any other active DHCP servers on your network.
- The Internet Information Services (IIS) role so we can host files via HTTP.
- The AdGuard software, of course.
Configuring AdGuard is also beyond the scope of this post, since it's somewhat subjective anyway, but the one thing you will want to do is enable "Use AdGuard as an HTTP proxy" under the Network settings.
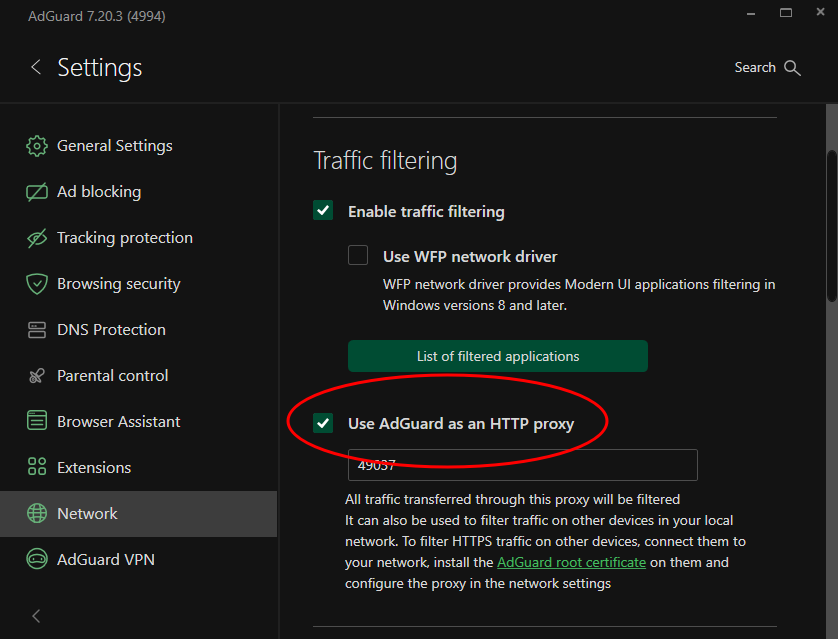
Either select a port number or stick with the default, but make note of it and the IP address of your server for later. You'll also want to make sure you set a rule to allow inbound traffic to that port on the Windows firewall.
Super PACs
Ideally, we want to have all our devices automatically discover the proxy without needing manual configuration on each one. Fortunately, there's a standard that handles this.
The Proxy Auto-Configuration (PAC) file format is a method to handle routing network traffic to a proxy (or even multiple proxies) programmatically. The file is effectively a single JavaScript function that evaluates the network request and decides where to send it. PAC files let you create some complicated routing rules if you're in a network environment that requires it. In our case, however, the file should be pretty simple.
- Any internal network traffic (internal IP addresses, single-label domains, and, optionally, internal domains) should go straight to their destination and bypass the proxy.
- Anything else is probably Internet traffic and should pass through the proxy.
For the PAC file to work, we'll need to define a function called FindProxyForURL, which will return either the IP/hostname of our proxy server or DIRECT for connections that shouldn't be routed through the proxy. There are a handful of predefined functions that can be used to evaluate the target URL, which Mozilla's documentation explains better than I can.
For our test environment, we'll be using 10.9.8.0/24 for our local subnet, and we have an AD domain set up under local.501jfw.moe. AdGuard will be running on a dedicated server at the IP address 10.9.8.11. For this environment, our PAC file would look something like this.
function FindProxyForURL(url, host) {
  host = host.toLowerCase();
  if (
    isPlainHostName(host) ||
    dnsDomainIs(host, ".local.501jfw.moe") ||
    isInNet(host, "10.9.8.0", "255.255.255.0")
  ) {
    return "DIRECT";
  }
  return "PROXY 10.9.8.11:49037";
}
Let's briefly break down what we're doing here. First, to make sure there isn't any weirdness with case, we'll take the hostname and explicitly convert it to lowercase. Next, we check if the hostname is a single-label domain with the isPlainHostName() function. Particularly in our AD environment, where we're likely to be using NETBIOS names, this should detect and exclude local traffic pretty consistently. We'll also exclude any AD FQDNs with the dnsDomainIs function. Finally, we check for anything we may have missed with the isInNet() function, which will check if the IP address we're trying to connect to is in our local subnet. If all these checks pass, we should be good to forward the request to the proxy.
You'll need to adapt this basic framework to your local network, and you can look through Mozilla's documentation to see if there are any other functions you want to use to filter the traffic further.
We'll save this file as wpad.pac and put it in C:\inetpub\wwwroot so it's accessible through IIS.
MIME Artist
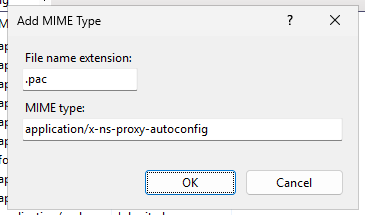
If you try accessing the new PAC file from your browser, you might notice that IIS returns a 404 error. Helpfully, if you're testing in a browser running on the same server that IIS is running on, Windows will give you a more specific and helpful error message than something like Apache or Nginx would. The error is because IIS does not include a MIME type for the .pac file extension out of the box.
MIME types are basically a description of what a file is and how to use it. Browsers don't check file extensions when determining how to handle files they try to load. Instead, they check the MIME type as defined by the Content-Type header. While this header can be set programmatically if you're running a web app, the web server can also set this header based on the file extension. If the MIME type is not defined in the web server's configuration, it will refuse to load the file, instead returning a 404 error.
In the IIS Manager, drill down in the navigation bar on the left side to "Default Web Site" and double-click "MIME Types". Click "Add..." in the actions bar on the right. We'll add our .pac file extension and give it the MIME type application/x-ns-proxy-autoconfig.
Now our PAC file should be ready for us to deploy to the network.
The Deployment
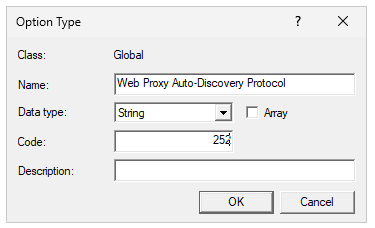
You may know DHCP as the protocol that assigns IP addresses to devices. That's true, but it can be responsible for so much more, like defining the default gateway, DNS servers, time servers for clock sync, and many other autodiscovery options. Critically for us, one of those other autodiscovery options is the location of that PAC file. This is the Web Proxy Auto-Discovery (WPAD) protocol.
WPAD is not a configurable DHCP option in Windows by default, so we'll have to add it first. Assuming you've already set up your DHCP server and added an IPv4 scope, first open the DHCP manager on the server, right-click "IPv4", and select "Set Predefined Options..." from the menu. Next, click the "Add..." button to add our new option. WPAD is DHCP option 252, so use that as the code and set the data type to "String". Fill out the name and description in a way that you'll recognize if you have to come back to it later.
Now, under the scope options of your DHCP scope, you can set the WPAD option to the URL of your PAC file on the web server. Any client devices that pull dynamic IP addresses should now also pull your proxy configuration.
The HTTPS Problem
You may notice, however, that you have issues accessing HTTPS sites (which is, at this point, almost the entire Internet). This is due to AdGuard's HTTPS filtering. The exact specifics of how this works are out of scope for this post (mostly because I don't 100% understand how it works), but here's the CliffsNotes version.
HTTPS encrypts the connection between your computer and the websites you visit, making it much more difficult for an attacker to intercept and read that communication. While great for security, it does create an issue for content filtering solutions, since they can no longer intercept that traffic to monitor or block it. To address that issue, AdGuard has its own certificate that you need to install in order for it to be able to access and filter HTTPS-protected content.
This does still create an issue for your smart bathtub and other random network-connected devices, as you probably can't install certificates on them. However, for your phone and computer, you should still be able to block ads on those. Once the proxy is set up, you can go to local.adguard.org on the server to download the certificate. From there, you can put the certificate in some kind of centralized location so you can download and install it on any devices you want to protect.
Alternatively, you can disable HTTPS filtering in the AdGuard settings and just filter HTTP content.
Conclusion
This is a lot to set up and probably not really a practical whole-home adblock solution in the long term. Still, there were a lot more learnable moments than I expected to find. Hopefully you learned something along the way that could help you in the future.
